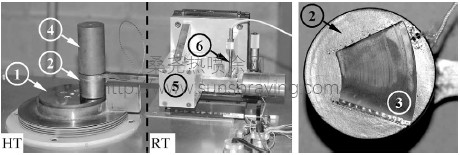
Thrust bearing tests were performed to evaluate different coating combinations on the foil bearings and the counterface. Particular emphasis was given to the influence of temperature on the tribological behavior at the contacts. The tribometer was used in a pad on disk configuration, in which a foil bearing pad was attached to a bottom surface of a cylindrical specimen holder (Fig. 5). Single compliant thrust bearing foils with a pad angle of 438, an inner radius of 23.5 mm, an outer radius of 48.5 mm, and a thickness of 0.15 mm were prepared for testing. This involved heat treatment of the top foils, deposition of the coating and polishing of the coating to achieve a surface finish of RaZ0.3 mm or better. Disk surface preparation was slightly different for PS304 and hard chrome coatings than for the other two coatings. The initial thickness of the PS304 and hard chrome coatings was relatively large (120 and 180 mm, respectively); the disk surfaces were ground after each test and reused. The coating thickness decreased with each test, typically by about 10 mm. Since the dense chrome and coating D were very thin (w5 mm), they were completely removed after each test by grinding and a new coating was reapplied. The final Ra surface roughness of the disks before testing was typically in the range of 0.1–0.2 mm. The tribometer sensors were calibrated and a procedure was developed to ensure proper alignment of the test bearing pad with respect to the disk. This alignment is critical because misalignment may cause uneven and accelerated pad wear. Due to the expected thermal expansion of the high temperature (HT) section of the tribometer, which includes the pad holder, disk and spindle components, the pad alignment varies with temperature. As the temperature of the HT section is increased, the HT end of the pivoted arm could move upward causing arm rotation around the pivot and the center of pressure at the disk/pad contact shifts towards disk outer diameter. Consequently, a pad that is perfectly aligned at room temperature can be misaligned at higher temperatures. A change in alignment on the order of 7 mm/mm per 100 ℃ of temperature change in the HT section was initially observed prior to making the following corrections.

本文由桑尧热喷涂网收集整理。本站文章未经允许不得转载;如欲转载请注明出处,北京桑尧科技开发有限公司网址:http://www.sunspraying.com/
|

